
Steel Division 2 – Game Manual
Welcome to the Steel Division 2 Manual! Here you will find the basics to start to play and enjoy the game. Have fun!
Introduction
Commander, welcome to Steel Division 2. We have been expecting you!
Steel Division 2 is the follow-up to the popular tactical RTS Steel Division: Normandy 44. Like the previous installment in the series, Steel Division 2 is not only being developed but also self-published by the French independent studio Eugen Systems (R.U.S.E, Wargame series).
Set during the Operation Bagration, the massive Soviet offensive on the Eastern Front in the summer of 1944, Steel Division 2 sees the introduction of a host of new content and features, including the brand-new dynamic campaign mode, Army General, six Historical Missions, new game modes and mechanics, over 600 new units, and much more.
Commander, study this manual carefully and surely you will be victorious on the battlefield. Get ready to fight!
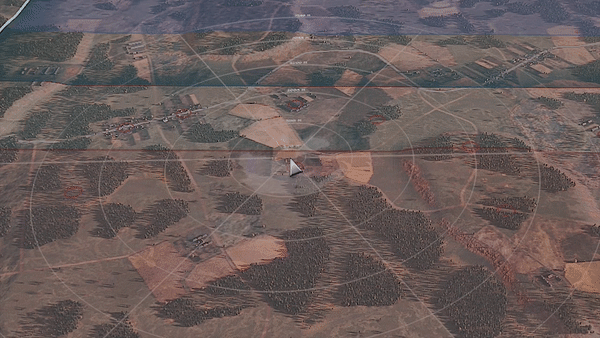
Army General
Welcome to Army General, Steel Division 2’s new turn-based Dynamic Strategic Campaign mode.
In the new Army General mode, you will be able to play through a dynamic campaign that faithfully represents, on a 1:1 scale, some of the most important Operation Bagration battles that took place on the Eastern Front in the summer of 1944. You will be able to pick either side, German or Soviet, and command dozens of authentic battalions and air squadrons. Each campaign covers a different sector of the front and runs for a select number of days.
Steel Division 2 will ship with four different Army General campaigns:
- Orsha – June 23rd to June 26th
- Berezina – June 26th to July 3rd
- Bobruisk – June 27th to July 2nd
- Baranovitchi – July 3rd to July 9th
With Army General, we set out to simulate a new game experience: the operational scale of warfare. This is a level that sits between grand strategy (the management of an army as a whole, economic policy, diplomacy) and the tactical experience (the familiar real-time tactical battles found in Steel Division 2’s Skirmish mode).
The operational scale of Army General simulates four major elements:
- Space: the geographical area measured on a map approximately 100 km by 100 km.
- Time: the period a campaign lasts. Each operation has a beginning and an end and runs for a limited number of days.
- The means: this is the distribution of forces that exist at the beginning of a campaign and any potential reinforcements that might arrive.
- The objectives: the targets both sides aim to achieve, which are defined on a strategic level and include military goals such as bridges, train stations or towns.
How Army General works
In Army General, a player embodies the role of a commander in charge of dozens of battalions and air squadrons. If they pick the Germans, they will take command as a Corps General; for a Soviet player, they take on the mantle as an Army General.
At the start of the campaign, the player will receive their strategic orders from high command. In the vast majority of situations, they will be tasked to either hold the battlefield while the other commander will try to seize it or vice versa.
An operational game of Army General is played on a turn-based basis, where each turn represents approximately 3 hours. Note, that each turn has two distinct phases: a phase for player 1 and a phase for player 2.
During his or her phase, a player can do the following actions:
- Move units (land battalions or air squadrons)
- Order units to use special actions (digging in, deploying anti-air defenses, etc.)
- Initiate an attack, and engage in battle
- Deploy reinforcements
A campaign in Army General ends as soon as the objectives have been met, or when the timer runs out.
Unit Characteristics
Let’s take a closer look at the units you will be able to command in Army General. Unlike Steel Division 2’s real-time tactical battles, which focuses on individual tanks or squads of soldiers, the formation of choice in Army General is the battalion.
Each land unit that you see on the campaign map represents a battalion. These battalions are authentic representations of real-life formations; they are meticulously researched, allowing each unit to field the appropriate type of equipment or vehicles, as well as the number of soldiers.
As a refresher, the battalion occupies a specific place in a nation’s military hierarchy.
| Name | Symbol |
|---|---|
| Army Group | XXXXX |
| Army | XXXX |
| Corps | XXX |
| Division | XX |
| Brigade | X |
| Regiment | III |
| Battalion | II |
| Company | I |
To make things a little bit more complicated, while the above hierarchy is usually respected by all countries, this is not the case when it comes to the actual number of troops or tanks. This was especially true for Wehrmacht and Red Army formations. A complete German division was about the size of a Russian Army Corps, for instance. In order to make Steel Division 2 more authentic, we opted to keep this important distinguishing detail.
The Battalion
The battalion is represented by a lead figurine which gives an indication of its type.
There are three important details to keep in mind when viewing the information displayed under a battalion:
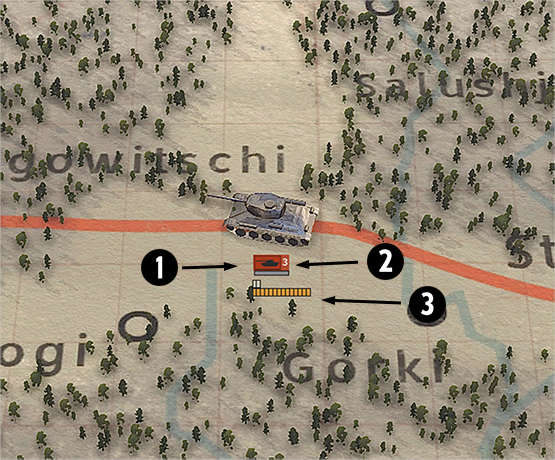
- The type, such as infantry or armored battalion.
- The number of action points.
- The battalion’s fighting abilities across three different colored categories: Melee Combat, Armor Combat, and Support.
The easiest way to understand a battalion is to select it. You are now presented with a detailed overview of the battalion. The top of the interface displays:
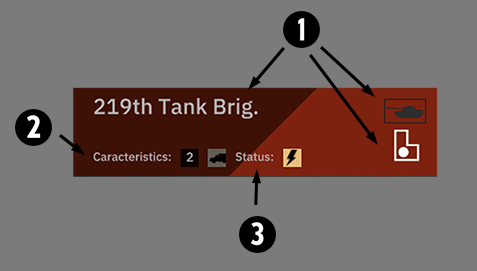
- The battalion’s name, type, and parent division it belongs to.
- The battalion’s characteristics, for instance, if it is motorized or not.
- The battalion’s status, such as deployed, fortified, in a forest, out of supply, etc.
The middle of the interface might look overwhelming at first glance, but shows the detailed composition of a selected battalion, as well as its combat values. This is a critical information panel. It allows you to get to know your units in depth and should be studied carefully, as it highlights the strengths and weaknesses of each unit.
It was necessary for us to imagine a system that was both simple and also consistent with the real-time tactical battle experience. At the same time, it should show at a glance all the necessary details, including the fighting power of a battalion.
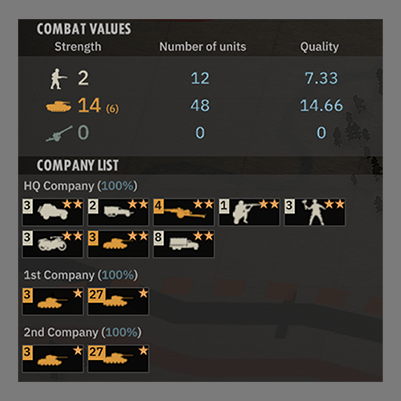
As you can see, each battalion is furthermore made up of tactical units, which can be found in the Company List. The number above the tactical unit’s icon corresponds to how many of that unit you are able to bring to a battle. The stars represent the veterancy experience level on a scale of 1-3 stars.
Fighting Power Representation
To understand the fighting power of a battalion, keep in mind the following:
- Like during a Skirmish real-time tactical battle, a battalion in combat can only take out a limited number of its subordinate tactical units per minute.
- All battalions will have access to 50 Requisition Points per Phase. This means they will have 150 points for a battle that lasts 3 Phases.
- All tactical units, found in the Company list, are worth either 1 Requisition Point (infantry squads, artillery pieces, etc.) or 3 Requisition Points (tanks, airplanes, large anti-tank guns, etc.). This means that an elite Tiger heavy tank will cost the same to use as an older model Panzer II.
Let’s go through the different aspects highlighted in the battalion overview. From the top:
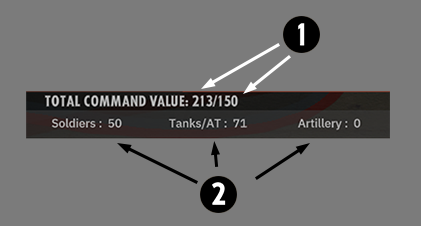
- The Command Value is the sum of all the tactical units’ Requisition Points. In this example, the battalion has a total of 213 Requisition Points. This means that it has more tactical units than it can use in a 3 Phase tactical battle (which can never be more than the total 150 Requisition Points). We call this surplus “a reserve”.
- Underneath the Total Command Value is a breakdown of the unit’s size across three different categories: infantry (soldiers), tanks and anti-tank guns, and artillery. These are indicative numbers and are not linked to Requisition Points.
Each tactical unit scores points in one of the following categories (units seldom score points in multiple categories):
- Melee combat: This is short-range combat dominated by infantry, light vehicles, crewed weapons such as heavy machine guns.
- Armor combat: This is long-range combat and armored combat. Obviously, this means to represent tank warfare, but also anti-tank guns and ground attack planes.
- Support: This more of an additional bonus than a real fighting category as this category represents suppressive weapons such as flamethrowers, artillery pieces, bombers, and the like.
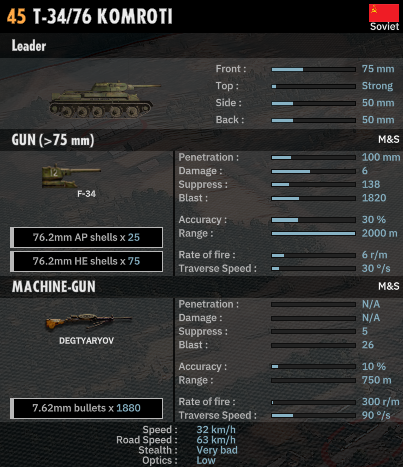
Let’s take one last step before we return to the battalion overview panel. If you select a tactical unit belonging to a battalion, you will see:
- The Combat Value for the tactical unit. In this case, it is Armor Combat, represented by the tank icon, and its value is 0.3.
- The tactical unit’s cost in Requisition Points. Again, as it is an armored unit, it will cost 3 Requisition Points.
For air units and units with anti-air abilities, two additional values will be displayed:
- The ability of the unit to destroy air targets. This value is extremely important for air combat, but also carries weight in land combat. It shows you if you can defend yourself, and how, against incoming air threats.
- Escape ability. This value is only used for Air to Ground or Ground to Air combat while using the Auto Resolve mechanic (more about this later). Reserved for air squadrons, it represents the ability for an aircraft to avoid being hit by anti-aircraft defenses or opposing aircraft.
So, if we go back to our battalion overview, in the middle panel, we can see the Combat Values summarized:

The example battalion scores 14 points in Armor Combat and 2 points in Melee Combat. The number in brackets (6) in the Armor Combat category indicates the reserve pool.
Two additional values, Number of Units and Quality, are purely indicative. It gives the player another indicator of how well a selected battalion will do in direct comparison with an enemy battalion.
Let’s compare our example, the Soviet 219th Tank Brigade, with the 1st battalion of 31st Regiment of the 5. Panzer Division (which happens to be one of the best German armored battalions represented in Army General).
 The most important detail you can glean is the Armor Combat value for both battalions.
- Both battalions basically have the same amount of tanks (48 tanks for the Red Army; 44 tanks for the Wehrmacht) but that the German tanks have a Quality of 28.59 (higher is better) while the Soviets only have a Quality of 14.66.
- This means that the final Armor Combat value is 14 for the 219th Tank Brigade and an impressive 25 Armor Combat value for the 5. Panzer Division battalion.
A final piece of information regarding the staffing of a battalion.
We distinguish between a company HQ and other (combat) companies. This mechanic is as realistic (*) as possible, and can be found in real-life companies.
*This is also a reflection of making sure the game remains compelling, even when playing with historical battalions that were very small. Where possible, we merged these battalions to give players the option to command only the most interesting units. Rest assured, we kept as close as possible to historical reality, with these merged battalions being faithfully placed in their real-life regiment, brigade or division.
Action Points
Action Points represents what a battalion can do before it becomes fatigued. Every action taken by a battalion or air squadron causes fatigue and therefore costs Action Points.
Fear not, because at the end of each turn (3 hours on the campaign map), a battalion will recover Action Points if they are in the supply zone (see the section refueling for more details). The supply zone is your zone of control; the enemy’s territory is delineated by the darker shade on the map.
Not each battalion comes with the same amount of Action Points. The number of Action Points depends on the type of battalion. This reflects that not all battalions were trained and equipped equally, with some being able to undertake more actions than others.
The following table shows how many Action Points each type of battalion has and how many they can recover each turn:
| Type | Total Action Points | Action Points recovery per turn |
|---|---|---|
| Recon | 4 | 3 |
| HQ | 3 | 3 |
| Land (all) | 3 | 2 |
| Partisans | 2 | 2 |
Moving land units
To get to the action, you need to move! Moving your land units will take into account the type of terrain crossed, and the level of motorization of a battalion. Moving battalions costs Action Points.
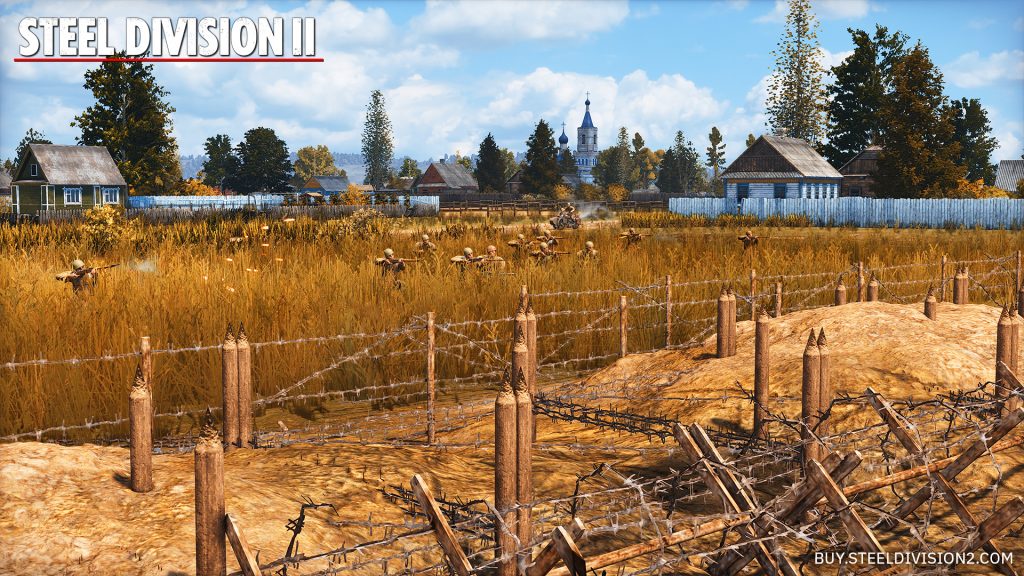
Historically, the countryside of Belarus where most of the fighting happened during Operation Bagration was wild and vast with untamed forests and marshlands. Few roads existed, and the ones that did were frequently no more than simple dirt paths. Only a small amount of roads were paved – these were classified (rather unfitting) as highways.
The following table summarizes the distances that can be covered (in kilometers) across different types of terrain, taking into account if a battalion is motorized or non-motorized.
| Type of terrain | Motorized | Non-motorized |
|---|---|---|
| Asphalt road | 65 km | 35 km |
| Paths and unpaved roads | 45 km | 32 km |
| Forests, marshes or difficult terrain | 15 km | 21 km |
This symbol indicates whether a battalion is motorized or not:
Combat
The most important aspect of Army General, obviously, is combat. In our new mode, we have separated combat into three different categories: ground combat, air combat, and air-to-ground combat.
Ground combat
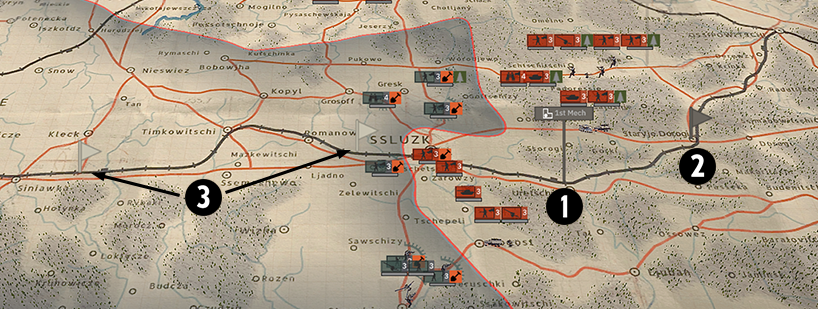
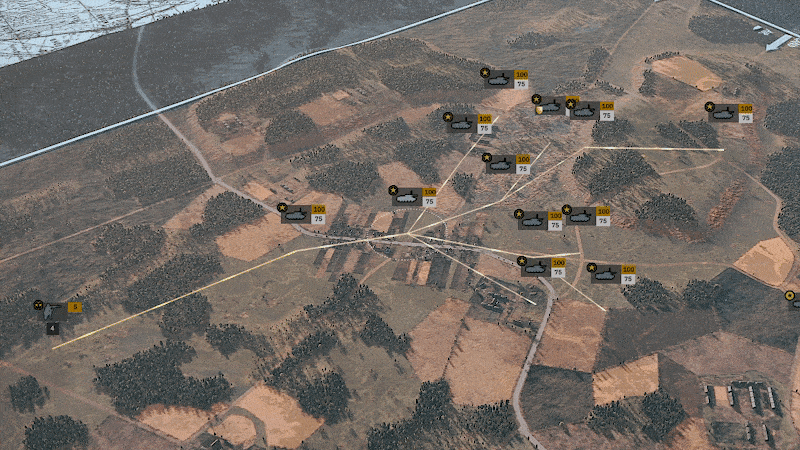
In Army General, you will be able to plan how you want to do battle. The first thing you need to decide is where to attack.
 From this location on the battlefield, the time of arrival of your battalions will be calculated. This will depend on the distance of the battalion to the engagement point.
Each combat encounter, be it a real-time tactical battle or resolved on the campaign map (more about this later), is divided into three distinct Phases – A, B, and C. The phase a battalion arrives in depends on how far they are situated from the battle location – or if they are too far away, they might never arrive on time at all.
You should also take into account the amount of Action Points still available (which signifies the state of fatigue of a battalion). For instance, if a battalion is physically close enough to participate in a battle and enter in Phase A but only has 2 Action Points remaining, it will only be able to arrive in Phase B.
In the above image, you can also see that the opponent’s battalions are dug-in (indicated by the orange icon underneath the unit name) as well as being deployed (the grey defensive line around a unit). Assaulting these units will prove to be a tough challenge!
Each battle can only contain three battalions (or air squadrons). This gameplay choice was made to respect the logic of limited battlefield space. It did not seem credible to us to be able to pile battalion after battalion into combat without any consequence.
Once you are satisfied with which battalions you want to do battle, and in which Phase they will arrive, the battle can be resolved. This can be done in three distinct ways.
Tactical Resolution
Tactical resolution allows you to fight the opponent yourself. You will select which units you want to control, and you will be transported to a real-time tactical battle. However, there are some key differences between a tactical resolution battle in Army General and a traditional Skirmish battle.
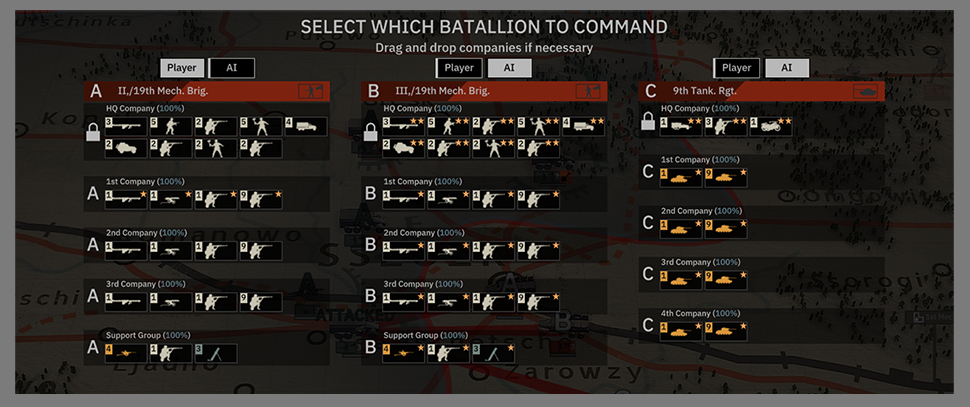
Before you actually begin the battle, by using the screen seen below, the player can decide if they want to leave the control to one or more of the battalions to the computer. They can even decide to remove certain companies from a battalion. Only HQ companies can’t be detached from one battalion to the other. We feel this gives the player the flexibility to play in whatever way they like, with whatever unit, and not to get bogged down in uninteresting battles (if there are any in Army General!).
 During the tactical battle, the goal is to control all the terrain by capturing the objectives found across a map. If successful, it will force the enemy off the map. Which battle format you will encounter depends on the strategic situation on the campaign map. There are a couple of variations.
- The opponent can be fortified or dug-in, which means they will control most of the tactical map from the start and will be able to deploy fortifications and defenses (Breakthrough mode).
- The enemy can be deployed, but not dug-in, which means they will control most of the map but without access to any of their defenses.
- If both the player and the opponent engage one another without any of the above modifiers, they will start equidistant on the tactical map and will move to meet and fight (Conquest: Eastern Front).
As you might remember, each battalion will contribute 50 Requisition Points per Phase. To be exact, each battalion provides 20 Requisition points and 3 points per minute during Phase A (which makes 20 + 3 x 10 = 50 points in total).
The deployment menu has changed a little bit from the menu seen during a typical Skirmish game. The traditional unit categories (reconnaissance, infantry, tanks, etc.) are replaced by a battalion, and features the list of subordinate companies each battalion brings.
Auto Resolve
As a player, you can choose to fight the battle yourself (choosing which units to bring, and which ones the computer will control) or you can opt for the computer to resolve the whole battle automatically – the Auto Resolve mechanic. Again, we wanted to give the player the flexibility and freedom to play and fight the battles they want.
We put in a lot of effort to make the Auto Resolve as intuitive and realistic as possible. The results you’ll get when you allow the computer to simulate the battle should be as close as possible to a tactical battle fought by a human player.
How does it work? For each Phase, the Combat Values for both sides are compared.

- For each side, we sum up the 3 main Combat Values, seen here.
- We compare both sums one by one, for each category. The result is influenced by the following rules (which serve to simulate a variety of aspects of warfare):
+5 max for Melee Combat
+10 max for Armored Combat when not in a forest (+5 max when in a forest)
+2 max for support
+2 bonus for a deployed defender - The sums are added together and checked. The difference, in favor of one of the sides, is displayed. In the above image, we can see: Red Army (+10 and +2) – Wehrmacht (+5 and +2) = 5 in favor of the Soviets.
- The outcome of the battle is displayed at the top of the screen, as well as the type of battle (in this case, Breakthrough). If the final result is 5 and above in favor of one of the sides, there are chances that the battle will end earlier.
Depending on this final result, losses will be applied to each side according to the following table:
| -8 | -7 | -6 | -5 | -4 | -3 | -2 | -1 | 0 | 1 | 2 | 3 | 4 | 5 | 6 | 7 | 8 | |
|---|---|---|---|---|---|---|---|---|---|---|---|---|---|---|---|---|---|
| Att. | 100% | 70% | 60% | 55% | 50% | 45% | 40% | 35% | 30% | 30% | 30% | 30% | 30% | 15% | 15% | 15% | 10% |
| Def. | 10% | 10% | 10% | 10% | 30% | 30% | 30% | 30% | 30% | 30% | 30% | 30% | 30% | 50% | 60% | 70% | 100% |
There are different types of victory conditions:
| Result | Victory type |
|---|---|
| -12 | Attacker Major Defeat |
| -10 | Attacker Major Defeat |
| -5 | Attacker Minor Defeat |
| 2 | Draw |
| 5 | Attacker Minor Victory |
| 10 | Attacker Major Victory |
| 12 | Attacker Total Victory |
Depending on the results per Phase, there is a chance the battle will end prematurely:
| Final Result | Chance of premature end |
|---|---|
| (+/-) 5 | 33% |
| (+/-) 8 | 50% |
| (+/-) 10 | 70% |
Semi-Auto Resolve
To make things even easier, we have also opted for a special semi-Auto Resolve mechanic. This works the same as Auto Resolve, but with the added ability for the player to precisely select, phase by phase, which battalion should be involved in the battle.
Air combat
Air combat on the campaign map works in a slightly different way compared to ground combat between battalions. It lasts a single phase on the campaign map.
The objective of air combat is always to hunt down flying enemy aircraft and force them to return to base.
There are two types of air combat. The first one involves airplanes engaging each other, air-to-air combat; the second type is combat between aircraft and anti-aircraft units on the ground, air-to-ground combat.
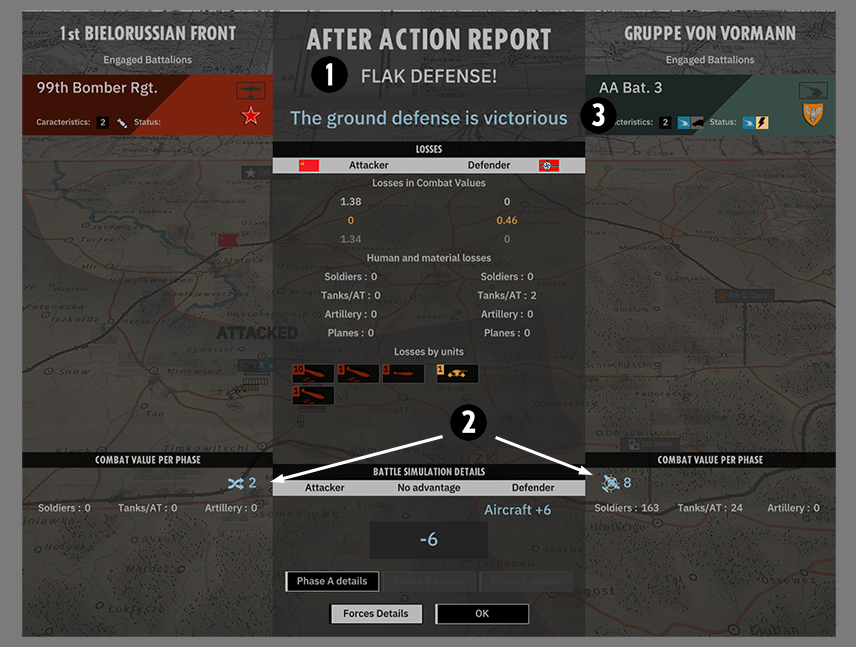 These two types of air combat are always resolved automatically. The above image gives you an example of an after action report between a German Flak unit and a Soviet bomber squadron.
- Indicates the type of air combat. This can either be air-to-air or air-to-ground.
- Here you will see the Combat Value of the anti-aircraft unit (8) compared to the Evasion Value of the bomber squadron (2). The final result is -6 in favor of the defender.
- Depending on the results of the air combat, the bomber squadron will continue its mission or be forced back to base.
You can also see in detail any losses stemming from the engagement.
Air squadrons
As much as land combat is different from air combat, air units (grouped as air squadrons) are also treated differently in Army General. What actions they can undertake depends on the type of aircraft a squadron fields.
Different types of aircraft can do different things, such as:
- Reconnaissance
- Interception
- Bombing
- Ground attack
Remember that air squadrons have general combat values, and can be used by any commander in land combat.
Reconnaissance
Reconnaissance planes can perform a reconnaissance mission anywhere on the map. This is an action that lasts 1 full turn (the player’s phase, then the opponent’s phase as well).
The area surveyed is limited to the recognition radius displayed around the aircraft unit.
Interceptors
Interceptors have the interception ability which allows them to stay in place for a full turn and do a combat air patrol. They will intercept any enemy air squadron entering their perimeter.
Bombers
Bombers have the ability to bomb any visible enemy unit. Issuing this order will have the effect of removing all Action Points of the bombed unit if the attacking bombers are successful.
Ground attack aircraft
Ground attack aircraft do not have any special abilities, and as such, are used primarily to support your battalions in land combat.
Reinforcements
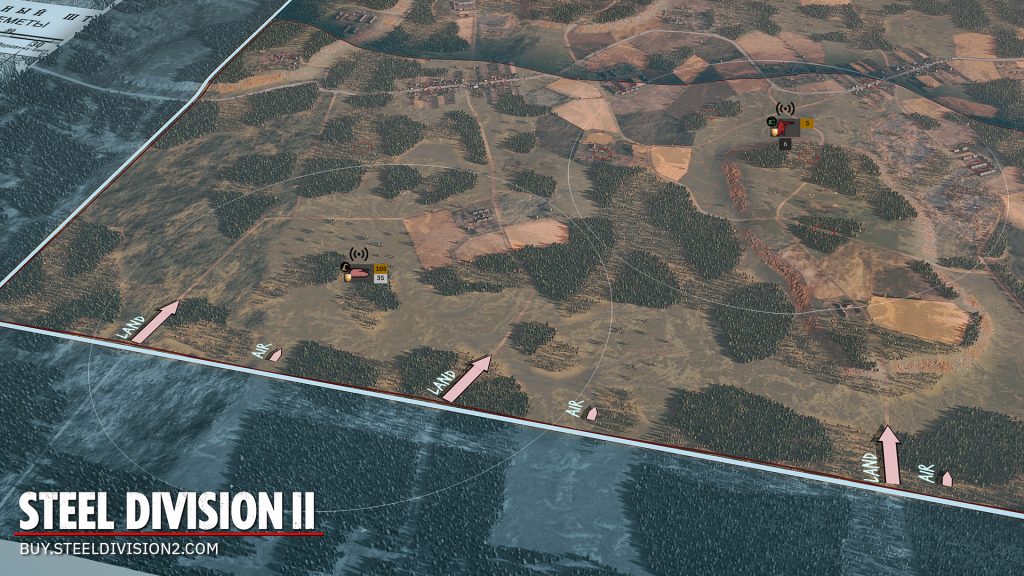
Not all of your units will be deployed on the map at the start of the game. Throughout an Army General campaign, additional forces will become available to the player.
You can view which units will reinforce you at the top of the screen. It will also indicate when these reinforcements will become available.
Reinforcements can’t be deployed straight away, they require Reinforcement Points to be deployed. The number of Reinforcement Points, which increases every turn, can also be viewed at the top of the screen. Reinforcements come as parent divisions, with subordinate battalions under their control. Once deployed, you will be able to command these battalions on the field.
Each division has an entry route and potential landing points. If a particular point is secure, such as a recently captured train station, the division and its battalions can be deployed on that spot. This means that advancing and capturing these landing points, indicated with small flags, is extremely important for your fresh troops to enter the fight without having to move too long a distance.
- This icon indicates the closest possible deployment point to the frontline for the reinforcements to enter the map.
- These icons indicate other potential deployment points.
- These icons indicate where you are unable to deploy.
Resupply
Resupply is represented in Army General as the ability to receive ammunition, fuel, and food for the soldiers. The player does not have to deal individually with supply units or depots. The refueling works as soon as a battalion is in a secure area under your control (the lighter part of the campaign map).
Once per turn, your units will be refueled and resupplied. A unit will regain Action Points once resupplied. When a unit is unable to receive any resupply, it will suffer penalties which will worsen over time, until finally, it will be routed and will be unable to be moved or take part in further combat.
The following table summarizes what happens to a unit out of supply.
| 1 turn without supply | 2 turns without supply | 2 more turns without supply | |
|---|---|---|---|
| Penalty | None | Only 50% of Action Points are replenished | The unit is routed |
It should be noted that Soviet partisans are not impacted for being out of supply.
Skirmish
The real-time tactical battles of Steel Division 2 should be familiar to fans of Steel Division: Normandy 44. We have updated or changed many of the underlying game mechanics and features, including the introduction of new units, so be sure to read the following carefully.
The 4-phase tactical combat
Tactical battles in Steel Division 2 are divided into 4 distinct phases.
In Phase 0, the deployment phase, players need to place their units in the dedicated areas.
In Phase A to C, real-time combat begins, with each new phase allowing for additional units to be placed. Each phase also nets you a certain amount of points, depending on your Battlegroup’s income. While the first phases might see the deployment of lighter units, later phases will see the full gamut of combined forces come into play: the heaviest of tanks, the most advanced airplanes, the most destructive artillery.
Phase 0 – Deployment
- Placing units in the dedicated areas
- Roads are faster
- Giving the first orders that will be executed when the battle starts
- Deployment points
Phase A, B & C – Combat
- Phase & ecomony
- Requisition points
- Active pausing in solo
The Dynamic Frontline and Capture Points
The Dynamic Frontline is one of the most powerful visual tools in Steel Division 2. This line shows the ratio of power and level of influence a player has during a battle and will change according to the unit’s actions in the field. Every time a unit pushes forward, the line moves accordingly; if a unit routs or gets destroyed, the line drops back. The Dynamic Frontline serves as an objective indicator of how much influence a player has, and is tied directly to winning a match.
 Capture Points are new in Steel Division 2. These strategic objectives are spread out across the map in crucial locations, such as a bridge or a particularly important hill. If the player, with their units, advances the frontline to cover one of these Capture Points, they will be considered in their possession.
Suppression and Surrender
Every unit in Steel Division 2 has a suppression meter, appearing above the unit’s label when under attack. Different things happen when a unit starts to become suppressed.
- The more stressed a unit is, the less efficient they become on the battlefield.
- When the suppression meter is full, the crew of a motorized unit will bail out, while an air unit will automatically leave the area.
- If an infantry unit gets fully suppressed, they will be unable to move, unless the player tells it to retreat by pressing the “R” key.
- If a fully suppressed unit finds itself behind enemy lines, in the opponent’s influence zone, and with an enemy unit nearby, it will surrender and as a result removed from play.
Game Modes
The Steel Division 2 beta features three distinct game modes: Conquest (Eastern Front), Conquest (Closer Combat), and Breakthrough.
Conquest (Eastern Front)
In Conquest mode, Eastern Front variant, players will start on opposing sides of the map, their respective deployment areas close to the border. Transport vehicles will be vital to quickly move troops and take control of the Capture Points scattered across the map.
Conquest (Closer Combat)
Similar to Eastern Front, the Closer Combat variant of Conquest mode sees players deploy much closer to each other. With both sides already controlling one-third of the map, the battlefield between the two deployment areas will only be 2000 meters wide.
Breakthrough
Updated from the previous game, Breakthrough mode sees an attacking and defending side. Players who are on the attack will start on one edge of the map, controlling none of the objectives. Defending players control all of the objectives, and can deploy fixed defensive structures such as bunkers and barbed wire. The game’s economy is adjusted with attacking players having access to more resources.
Game interface
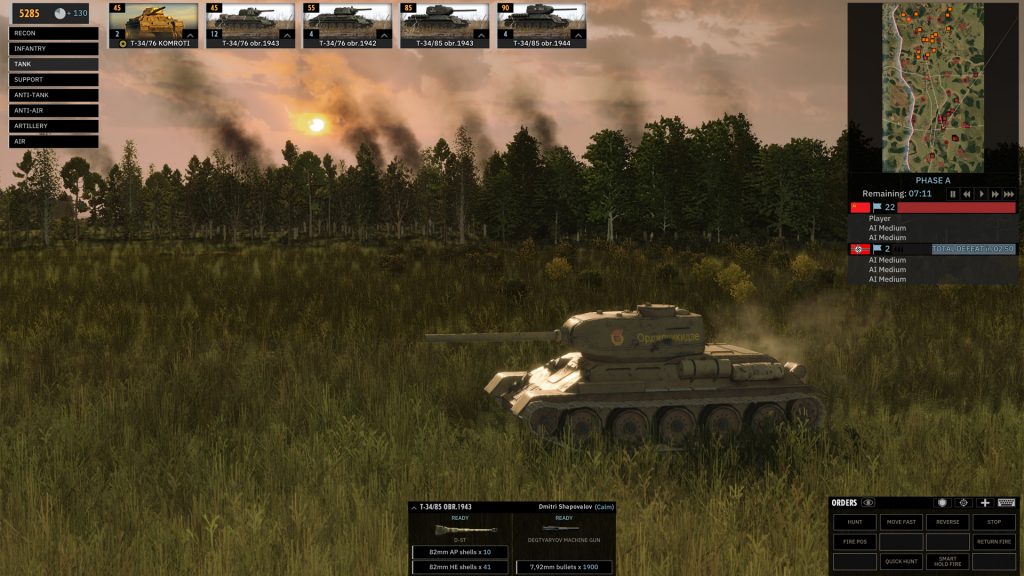 In the top left corner of your screen, the deployment menu allows you to deploy your units. Pick a unit’s category and then a Unit Card to place a unit on the map. It will also show you your Requisition Points and your current income.
In the bottom left corner, the off-map interface allows you to deploy aircraft and manage off-map artillery strikes.
In the top right corner, you can see the influence area on the map and the domination gauge. You also can keep an eye on the unit counters. On the top, you can see the time remaining, not only until the end of the match but also until the end of the phase. Finally, this interface allows you to change the game speed, from bullet time to very fast.
In the bottom right corner, you can find the interface for unit controls. It allows you to give orders to your troops, as well as deactivating their weapons. It also delivers information concerning your remaining ammo and your unit’s stress level.
Orders
Returning fans of Steel Division: Normandy 44 will recognize the inclusion of two new orders to the commander’s tactical toolbox.
Efficient Shot
This powerful new order (“Ctrl + H” key + left click at position) that tells the unit to hold fire until it has a penetration chance of 40% AND a hit chance of 40% on target. Only if these variables are met or exceeded will the ordered unit fire at an opponent. An excellent order for ambushes.
Quick Hunt
This new order (“Ctrl + Q” or “Ctrl + A” key + left click at position) works as a fusion between the ‘Move fast’ order and the ‘Attack’ order. Giving the ‘Quick Hunt’ order to a unit will make it fast travel using the road network but stop and attack any enemy troops if they are spotted along the way. An aggressive, search and destroy move.
Commanders
An important new unit can be found in Steel Division 2: the Commander. These valuable units provide a powerful boost to close-by troops. You can only bring one Commander unit per phase.
Like the subordinate Leader unit familiar to fans of the previous game, the Commander works with a ‘leader aura’ of 240 meters. Within this white-dotted circular area of effect, each unit will receive +2 XP to their experience level, and can’t be forced to surrender.
Not only that, the new Chain of Command mechanic allows your Commander units to link with Leader units if they are within range (1500 meters). If this connection is established, each linked Leader unit will provide an additional +1 XP. Each linked Leader in turn projects it’s own connection for another 1000 meters, allowing Leaders even further afield to give the same benefit to troops close at hand.
Radio
Another new unit bringing its own unique mechanic is the radio-equipped Artillerist unit. These special troops will be able to help your artillery pieces to rain more accurate fire on the enemy with the Corrected Shot mechanic.
 An Artillerist will have a circular area of effect centered on the unit. Thanks to the radio, any indirect fire artillery piece will shoot with greater accuracy into the Artillerist influence zone. When using Corrected Shot, firing shells into the area will reduce the aiming time, which increases the rate of fire of your artillery piece. If you want to fire a normal, uncorrected, shot, you press “Ctrl” key while aiming.
Defensive Structures in Breakthrough Mode
An exciting new feature in Steel Division 2 is the introduction of buildable defensive structures in Breakthrough mode. If you are the defending player in a Breakthrough match, you are now able to place your defensive structures in the deployment phase.
There are several types of defenses you can place:
- Barbed wire: A stretch of barbed wire will slow down any enemy troops – tanks and vehicles included. Barbed wire is “painted” on the map and measured in meters.
- Trenches: Deployed in the same manner as barbed wire, trenches will shelter infantry, offering the same amount of cover as being garrisoned in a house.
- Gun pits: These open-topped structures will protect a single piece of large equipment, such as anti-tank guns, AA guns or artillery. They are placed empty, and the player will have to define the field of fire.
- Bunkers: These hardened structures are essentially stationary weapons (machine guns, anti-tank rifles or guns) with armor. They are fixed positions, very well-protected, but with only a limited field of fire.
Players can paint on the map to draw where they want the barbed wire or trenches to go. The game will show you if there are any obstacles, such as rivers, hills or forests. The other structures are placed one at a time. The player can also rotate the defensive structures.
Defensive structures are like any other unit in your deck: they have their own category, and each unit card brings a certain number of individual structures or deployable length (in meters). Each division will have access to the same structure, but they can only be used in Breakthrough mode by a defending player.
Victory conditions
New in Steel Division 2 are the objective-based Capture Points. Each map in the closed beta holds 24 of these points. They can be found in all three of the modes.
Advancing the frontline to cover one of the Capture Points will bring them into the possession of the player. The more of these points one side controls, the more it will drain Conquest Points of their opponent.
The game ends when one side reaches zero Conquest Points.
There are a couple of possible outcomes:
- Draw: If the team possesses the same number of objectives.
- Minor Victory: If one team possesses +50% of the objectives.
- Major Victory: If one team possesses +75% of the objectives.
- Total Victory: If one team possesses +85% of the objectives.
General tips
Our games are demanding and can be intimidating the first time you play. By taking the time to learn the basic mechanics, you are making your first steps on the road to Steel Division 2 mastery. It might take some practice, but becoming the ultimate commander will be extremely rewarding!
Here are some tips for beginners:
Army General
- In the menu, the campaigns are displayed chronologically, but historically, the first one is the hardest one. Start with an easy campaign first if you’re not familiar with Army General
- Use the “Alt” key to display the strength of the battalions on the map
Skirmish
- Begin by playing a Skirmish match versus a Very Easy AI on a small map (Orsha North).
- Use the Active Pause (“P” key by default) as much as you can: will allow you to pause the game while still giving orders.
- Use the “Autofill” function when building your first Battlegroup.
Building your first Battlegroup
The Battlegroup is the selection of units you will deploy during the game. Each Battlegroup is created using our new Deck Builder. You first select a parent Division which will define the unit cards at your disposal, as well as the number of slots in each category. When building your Battlegroup, you need to think about how you want to deploy your units in each phase.
To build your battlegroup, click on the “Create Battlegroup” in the main menu and select a Division.
By clicking on “Auto-fill”, the battlegroup will be filled with units selected by the development team. You can customize this Battlegroup or start editing your own by clicking the “Edit” button.
In Steel Division 2 units are divided into different categories. These are:
- Recon
- Infantry
- Tank
- Support
- Anti-Tank
- Anti-Air
- Artillery
- Air
- Defense (only in Breakthrough mode)
Each category has a number of open slots, which cost Activation Points to use. Each Battlegroup has a total amount of Activation Points, indicated on the top-right of the Deck Builder screen. You can see that the cost rises with each additional unit card.
A new feature in Steel Division 2 is the Deployment Type option in the Deck Builder. This determines the amount of Requisition Points players will receive per phase. Now you can select how many points you want to have available for each phase, with four templates to choose from. Each template focuses on a different phase.
The deployment types are:
- Balanced (100/140/170)
- Juggernaut (90/120/230)
- Vanguard (130/120/110)
- Maverick (120/160/80)
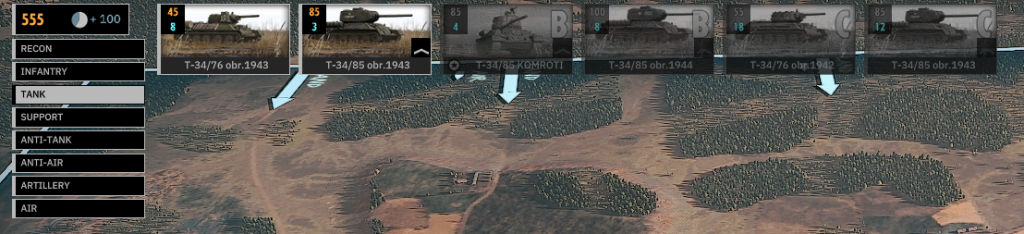
When you click on a category, the available units appear on the left of the screen. The unit card packs are made like this:
 When you select a unit card, two information panels will be shown on the right of the screen. On top, the Unit Configuration screen. On the bottom, detailed unit and weapon statistics.
Another new mechanic in Steel Division 2 is that unit cards are no longer bound to a phase. The Unit Configuration panel allows you to customize your unit, including which phase they will deploy. You can also determine their experience level. Both options will affect the available units per card. For recon and infantry, you can also select the transport vehicle.
To add a unit pack to your Battlegroup, click on the “Add Battlegroup” button in the Unit Configuration panel.
Deploying Units
At the start of a battle, in Phase 1, you can only deploy the units from your Battlegroup in the deployment area. This is a limited section of the map, shown as a colored rectangle on the battlefield. To deploy a unit, click on the deployment menu in the top left corner and chose a unit’s category. Click on a unit card and finally place it by clicking left on the map. You can remove a unit right-clicking on it on the battlefield, it will be put back in the deployment menu.
Once your units are placed, you can give them orders that will be executed when the battle properly begins with the start of Phase A. To give an order, left-click on the unit on the battlefield, then select an order and click on the place you want that order to be executed.
Each unit costs Requisition Points to be deployed. During a battle, you will gain a certain amount of income per phase (A, B, C) that depends on the Deployment Type you selected for your Battlegroup.
When you zoom out, you can see the way new units will enter the map once a battle is underway. Large arrows for Land and Air routes are displayed on the border of the battlefield. If the enemy controls one of these entry points, you cannot deploy units anymore.
Moving a Unit
There are several ways to move a unit, depending on its category.
Infantry, foot units:
- Hunt (“Q” key or “A” key for AZERTY + left click at position): The unit will move to the position, using as much cover as possible and will automatically engage a spotted enemy.
- Move (Right click at position): The unit will move straight to the position.
Vehicles:
- Move Fast (“F” key + left click at position): The unit will move to the position as fast as possible, using roads.
- Move (Right click at position): The unit will move straight to the position.
Unload a transport
Most of the infantry units, as well as some anti-tank and artillery, come with a transport vehicle. When you deploy the unit, you deploy its transport, and the unit needs to be unloaded on the battlefield. This kind of units can be spotted thanks to its label.
There are two ways of unloading a unit:
- Unload (“U” key): The transport will unload the unit immediately.
- Unload at Position (“Y” key + left click at the desired position): The transport will take the fastest way to the position and unload a unit. If the unit is unloaded near a cover (a building, a hedgerow…), it will automatically move to cover.
Notes: Roads are the fastest way to travel across the battlefield. Vehicles and soldiers are slower in a forest or on a field, but it may be a better cover. Choose your path wisely. Deploy your men in safety or else they may be ambushed by the enemy out in the open.
Engaging a Unit
- Normal Attack (Right click on the enemy): The unit will attack the designated enemy.
- Attack position (“T” key + left click at position): The unit will attack the designated position, whether there is a spotted enemy there or not.
Artillery only: Smoke position (“B” key + left click at position): The unit will smoke the position, blinding the enemy. - Riposte (“Z” key or “W” key with AZERTY): The unit will only shoot if it is targeted by the enemy.
- Quick Hunt (“Ctrl + Q” or “Ctrl + A” key + left click at position): A unit following this new order will move fast using roads, but stop and attack if it spots an enemy.
When a unit fires, it needs time to reload or adjust its aim. This is displayed as a timer above the unit label. When the chrono is full, the unit is able to fire.
Protecting and Hiding
Units can be protected and even hidden on the battlefield. It’s particularly useful if you want to ambush your foe or do some recon work. The new defensive structures in Steel Division 2 (trenches, gun pits, bunkers) also provide protection. When a unit is selected, and when you move your cursor on the map, it will display the level of cover.
For example, if you want to hide an infantry unit in the forest, click on your unit, then hover over the woods with your mouse and when the cursor turns green, click on it. When the unit is hidden, its label flickers. Units can also take cover in buildings. When your squad is inside, the building will appear in your units’ color.
Supplying a Unit
When a unit is out of ammo, an ammo icon flickers near its label. To resupply a unit with ammo, you need to bring a supply unit next to it. A blue icon flashes during the supply process.
Orders and Line of Sight
You should consider two things when you want to establish if you can move or fight:
- The range of the selected weapon
- The line of sight of the unit
Steel Division 2 offers you different tools to estimate if your action is worth it:
- “Shift” key: Displays every order you gave, like how far a unit is to its destination, but also targets and other information.
Different colors mean different actions
- Azure / Sky blue: Normal Move
- Blue: Move fast
- Red: Attack mode
 Line of Sight tool (“C” key): This is an incredibly powerful tool that shows the possible line of sight from a particular place or unit at any moment.
Check your surroundings: One circle in the Line of Sight tool equals 250 meters. The white area is what the unit can’t clearly see. In Steel Division 2, elevation is also taken into account. Use this to plan your unit’s actions carefully.
Recon
Reconnaissance units are the ears and eyes of your Battlegroup and are indispensable in scouting the battlefield and locating the enemy. As they don’t move the Dynamic Frontline in Steel Division 2, they are more discreet. As such, they can explore enemy territory more easily. Nevertheless, recon units are relatively weak and must be used carefully. They are not invisible and that they can be detected even while hidden. Try to position your reconnaissance units in elevated positions like hills and towers. Sometimes, you can disable the weapons of your reconnaissance units to keep them concealed.
This interface allows you to activate or deactivate the unit’s weapons. Click on a weapon in the menu to do so.
Aircraft and Off-Map Artillery
When you deploy an aircraft or an off-map artillery unit, it appears on the bottom left
of the screen in the off-map unit panel. To deploy an off-map unit, click on its name in this interface and right-click where you want it to go. The off-map units panel lists all of your off- map units and indicates their status. The gauge slowly decreasing represents the fuel limitations. Once it’s empty, the plane evacuates for a certain time to refuel and rearm, before being ready to be deployed again.

Air units have various functions depending on their load-out. They can be used to scout and unveil enemy positions, to intercept and engage other aircraft, or to attack ground units. Anti-Air units serve to protect your main units on the battlefield, they can suppress aircraft in their range.
Tanks and Anti-Tank
Tanks are powerful units able to fight against all ground units. They have weaknesses, including a narrow field-of-view. You need to use your recon units to unveil enemy troops, allowing your tanks to attack them before they have the time to react. Don’t rush the enemy with your tanks without scouting ahead!
You can use the “C” key to check your unit’s line of sight. Hitting the “G” key will reverse your tank, allowing it to turn its more armored front to the enemy. Anti-tank units are perfect for protecting your flanks and for ambushing any tank reckless enough to move too fast, too far.
Interface
Game interface
In the top left corner of your screen, the deployment menu allows you to deploy your units. Pick a unit’s category and then a Unit Card to place a unit on the map. It will also show you your Requisition Points and your current income.
In the bottom left corner, the off-map interface allows you to deploy aircraft and manage off-map artillery strikes.
In the top right corner, you can see the influence area on the map and the domination gauge. You also can keep an eye on the unit counters. On the top, you can see the time remaining, not only until the end of the match but also until the end of the phase. Finally, this interface allows you to change the game speed, from bullet time to very fast.
In the bottom right corner, you can find the interface for unit controls. It allows you to give orders to your troops, as well as deactivating their weapons. It also delivers information concerning your remaining ammo and your unit’s stress level.
Keyboard Shortcuts
Controlling the Camera
Keyboard controls – Qwerty
- W – Up
- S – Down
- A – Left
- D – Right
Keyboard controls – Azerty
- Z – Up
- S – Down
- Q – Left
- D – Right
Mouse
- Middle button + mouse movement – Rotate
- Scroll wheel – Zoom in / Zoom out
Controlling a Unit
- Left-click – Select a unit (holding the button will allow you to select several units at the same time)
- Double left-click – Select the same kind of units in the area
- Right-click – Move a unit to the destination
- Q or A + left-click – Hunt
- Ctrl + Q or Ctrl + A – Quick Hunt
- F + left-click – Move Fast (for land vehicles)
- U – Unload (for transport vehicles)
- Y + left click – Unload at position
- T – Fire at position
- Ctrl + H – Efficient Shot
- B + left click – Smoke position (for artillery)
- E – Stop moving and firing
- W or Z – Trigger the Riposte stance
- R – Retreat a panicked unit
- G – Reverse your tank
- C – Line of sight
- N – Activate or deactivate the auto cover